How to Germinate Seeds: Water, Oxygen, Temperature, and Light
There are few things more rewarding than seeing newly sowed seeds suddenly sprout. Even more rewarding is watching those sprouts become mature plants that yield a bountiful harvest all season long. Yet, unfortunately, seed sprouting can be a complicated business involving four primary variables: water, oxygen, temperature, and light. If you can get these four variables perfectly aligned, you’ll have the healthiest seedlings, plants, and harvests you’ve ever seen.
In this article, I’ll help you understand the basic components of seed starting and germination. Let’s begin!
1.) Water
Level 1 (Novice): Keep seeds moist.
Most seeds exist in a state of dormancy that prevents them from germinating until conditions are ripe. The evolutionary purpose of such dormancy is to prevent an organism’s seeds from germinating all at once in one place — birds, wind, rain, etc. all help carry seeds away from their mother. The goal of seed starting is to bring a seed out of its dormant stage and into its germination stage. And in order to do that, the seed needs to be exposed to moisture.
When you introduce a seed to water under the right conditions, the seed soaks up that water, swells, and breaks its outer shell. This process of water absorption and swelling is called “imbibition”. Once the shell bursts, the germinated seed – a burgeoning sprout – emerges from its shell and begins to grow.
But how does a sprout grow if it doesn’t have any leaves yet?
Sprouts don’t immediately need photosynthesis for energy because within each seed is an energy source, filled with carbohydrates and proteins, which the sprout uses to grow. (Ever wonder why seeds are so nutritious to eat?) By the time the sprout becomes a young seedling with its first leaves, the seed’s internal energy source has been mostly depleted, and from thereon, the seedling uses photosynthesis via its new leaves to convert light and carbon dioxide into energy. So, in addition to allowing the seed to swell and break through its shell, water also helps the seed metabolize its own internal energy source, which it uses to grow its first leaves.
Do you need a humidity dome? It’s not necessary, but a humidity dome can help control moisture and temperature levels of your seed beds. There are many risks of using a humidity dome – mold growth, lack of oxygen/air flow, high temperatures, etc. – so be sure to understand how to use them properly. In general, a humidity dome should be removed at the first sight of a sprouting seed.
2.) Oxygen
Level 2 (Apprentice): Keep seeds moist, but ensure they have access to breathable oxygen.
Most living organisms need oxygen to turn food into energy, one byproduct of which is cell reproduction. Since seeds internally store carbohydrates and proteins within as food, seeds need oxygen to metabolize those nutrients in order to produce energy. In other words, without oxygen, seeds cannot eat and therefore cannot germinate.
Though seeds need water, a completely submerged seed that has no access to oxygen in the atmosphere likely will not germinate (oxygen concentrations in air are much higher than in water). Likewise, a seed buried deep in the soil may be cut off from oxygen in the air, which can also result in non-germination.
So, when sowing your seeds, be sure to keep in mind that the seeds need access to oxygen. If you use the paper towel method of seed germination — wetting a paper towel and folding it over seeds — just be sure to keep some airflow between the seeds and paper. If you sow seeds directly in soil, covering them lightly with dirt will usually be sufficient.
3.) Temperature
Level 3 (Pro): Keep seeds moist, ensure they have access to breathable oxygen, and germinate your seeds in controlled temperature environments.
Seeds in the germination phase are especially sensitive to temperature. The temperature at which a seed germinates varies from plant to plant, but, in general, vegetable seeds germinate between 65 and 90° F (18 to 32° C), and most thrive between 75-85°F (24 to 30° C).
Though a particular seed may have a minimum and maximum temperature at which it can germinate, its optimal germination temperature exists within a small window of that range.
For example, asparagus has a min-max range of 50 and 95° F, but its optimal germination temperature is between 75 and 85° F. In general, the closer you germinate a seed to its min-max temperature limits, the more time it takes the seed to germinate. For example, at 50° F (min), an asparagus seed takes around 52 days to germinate; at 95° (max), it takes about 19 days to germinate; yet, at 77° (optimal temp), it takes only about 10 days to germinate, on average.
In general, try to control the temperature of the seeds as much as possible. Many gardeners germinate seeds indoors to avoid extremely cold or hot temperatures, but do so with caution. As we’ll cover in the next section, your seeds also need light.
Germinating a seed in too low or high temperatures will jeopardize germination. Below is a helpful guide for common vegetables.
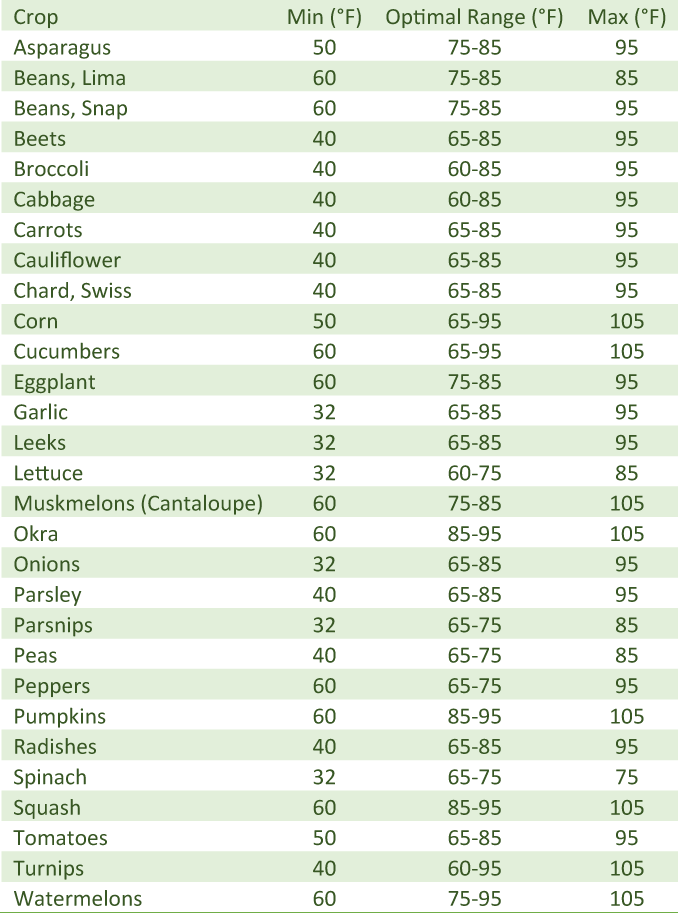
Source: Source: California Master Gardener Handbook, 2nd edition, Regents of the University of California, Division of Agriculture and Natural Resources, Publication 3382 (Table 5.2, page 114).
4.) Light
Level 4 (Master): Keep seeds moist, ensure they have access to breathable oxygen, and germinate your seeds in controlled temperature environments with ample, direct light.
Though many seeds prefer to germinate in darkness, once the shell cracks, the sprout needs access to light.
Some species of wild seed cannot germinate without light. Such seeds have evolved to stay dormant until a breach in the forest canopy allows light to shine on the forest floor where the seeds lie. Light-dependent seeds will not germinate, even with adequate water and warmth, until they have sufficient light. Lettuce and dill seeds are among these light-needing varieties.
However, common vegetable seeds used for home gardeners do not usually require light to initiate germination. In fact, the general rule for the common vegetable seed is to bury it two times its width in soil, essentially germinating it in darkness. Just be careful not to push a seed too deep into the soil.
All seeds are different, so be sure to check your seed packet for more precise instructions.
For a seed that germinates in darkness, once it sprouts and begins to grow into a seedling, the sprout will look for light and grow in its general direction. If the sprout emerges from the soil and sees no (or little) light, it will grow taller and taller to try to find light. But, as the stem of the sprout becomes longer and longer, it will no longer be able to support its own weight and eventually fall over. Such a process if often referred to as “legging” — seedlings with this deformity look like spindles of thread with tiny leaves. Try to avoid this.
However, if a sprout finds adequate light immediately, it will begin to grow leaves and start the early stages of photosynthesis. A healthy seedling will stand up tall, have healthy leaves, and a strong stem. If you grow seeds in a room with little to no direct light over them, you’ll have seedlings stretching their necks looking for a source of light.
In general, you want to expose sprouts to light as soon as possible, so long as you don’t expose them to too much heat.
If you’re germinating seeds outdoors, then I’d suggest not leaving newly sprouted seedlings under under direct sunlight all day long. Introduce them to direct sunlight gradually. If you’re growing indoors, then you’ll want to “harden off” your seeds before transplanting them by gradually introducing them to the outdoor weather conditions.
Red or Blue light?
When you grow outdoors, the intensity of the sun covers the entire color spectrum needed for the various stages of plant germination, growth, and flowering. However, if you’re growing indoors, you’ll want to tailor your light color to the appropriate stage of your plant’s development.
For those growing indoors, young plants that are growing disproportionately benefit from blue light. Blue light helps promote root development and plant growth. Once your plants have grown to the size you wish, switch to red light or a combination of blue/red to encourage flowering and blooming.
Well, that is all for now. I hope the above information is helpful. If you have any questions, comments, or would like to see a particular topic covered in this blog, please feel free to reach out to me: ryan@ehabitus.com.
Note: High quality seeds and high quality garden soil are prerequisites for good seed starting that I did not cover in this blog. For a starter on soil, see our blog article 3 Reasons Why Your Soil Needs Drainage. I recommend using Sow True Seed for the best heirloom seeds.